The ‘One-Tap Retouch’ Hack: Clean Up Your Shorts With Phone-Only AI Filters
You know the feeling. You film a Reel that sounds good, the idea is solid, the cuts are clean, then you watch it back and your face looks tired, the lighting looks muddy, and that random pile of laundry in the corner suddenly becomes the star of the video. It is frustrating because the content is not the problem. The polish is. And most people do not want to spend half an hour inside pro editing apps just to make one 20-second clip look decent.
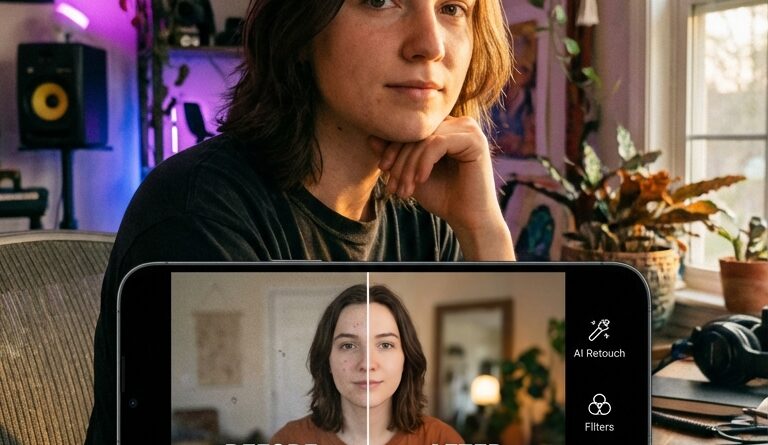
That is where the one-tap retouch trick comes in. A few phone editing apps now bundle skin smoothing, exposure balancing, sharpening, and even background cleanup into a single preset or slider. Used lightly, it can make your Shorts, Reels, and TikToks look brighter and more intentional in under a minute. The key is not making yourself look fake. It is fixing the stuff the phone camera exaggerated in the first place. Think less “beauty filter,” more “my room had bad lighting and my old phone did me dirty.”
⚡ In a Hurry? Key Takeaways
- Yes, there is a fast video editing retouch hack for reels and tiktok. Use a phone app with one-tap portrait or auto-enhance filters, then dial the effect back to around 20 to 40 percent.
- Start with lighting and texture fixes first. Brightness, noise reduction, and slight skin smoothing do more than heavy beauty effects.
- Keep it subtle. If your skin looks plastic or the background starts warping, you have gone too far.
The simple hack
The hack is this. Do your normal cut edits first. Then run the finished clip through a phone app that has an AI retouch or portrait enhance tool. In most cases, one tap applies a mix of face smoothing, exposure correction, contrast, and detail cleanup. After that, pull the strength down until it looks natural.
That last part matters. The best results usually come from using less of the filter, not more.
Apps that commonly offer this kind of feature include CapCut, Meitu, BeautyPlus, Prequel, and sometimes built-in phone gallery editors. Names vary. Look for labels like “Retouch,” “Portrait,” “Auto Enhance,” “Beautify,” “Face,” or “Enhance.”
Why this works better than endless manual tweaking
Short-form creators do not need cinema-grade color work for every clip. They need repeatable cleanup that makes footage feel clear and intentional.
One-tap retouch tools are good at fixing three common problems fast.
1. Harsh phone camera texture
Phone cameras, especially older ones, can make skin texture look rougher than it does in real life. A light retouch softens that without wiping out your face.
2. Flat or ugly lighting
Auto-enhance tools often lift shadows, rebalance highlights, and add a bit of warmth. That can rescue footage shot near a window, under kitchen lights, or in a car.
3. Busy-looking frames
Some apps now blur or simplify the background a little. That helps keep attention on you, even if your space is not exactly studio-ready.
How to do it in under 60 seconds
Here is the easiest workflow for a video editing retouch hack for reels and tiktok.
Step 1: Trim and caption first
Do your cuts, zooms, and captions before retouching if possible. That way you only process the final version once.
Step 2: Open the clip in a retouch-friendly app
Import the near-final video into CapCut, Meitu, BeautyPlus, or another app you already use.
Step 3: Tap the auto retouch or portrait tool
Let the app apply its suggested fix. Do not judge it yet. Most apps go too strong by default.
Step 4: Reduce the intensity
This is the real trick. Slide it down until you notice the improvement, but not the filter. Usually that lands somewhere around 20 to 40 percent.
Step 5: Add just one manual fix if needed
If the clip still looks rough, change only one extra thing. Usually exposure, warmth, or sharpness. Resist the urge to touch ten sliders.
Step 6: Export and compare
Watch the original and the edited version back to back. If the retouched clip looks cleaner but still looks like you, you nailed it.
Best settings to tweak if the one-tap version is not quite right
Sometimes the auto filter gets you 80 percent there. These are the safest extras to adjust.
Brightness or exposure
If your face still looks dim, raise it a little. A small bump often does more than heavy smoothing.
Noise reduction
Great for grainy indoor video. Use it lightly, or hair and facial details can turn mushy.
Skin smoothing
Keep it low. You want “better camera handling,” not “wax statue.”
Sharpening
Use this carefully after smoothing. Too much sharpening brings the ugly texture right back.
Background blur
Helpful for messy rooms, but only if the app tracks your outline well. If your shoulders or hair start flickering, turn it off.
What to avoid
This is where a lot of creators accidentally make good footage look cheap.
Do not over-whiten teeth or eyes
It looks strange fast. Most viewers will not know what changed, but they will feel that something is off.
Do not stack three beauty filters
One light pass is enough. Multiple apps can create weird skin tones and soft, blurry features.
Do not hide every bit of texture
Real skin is normal. A clean image is the goal, not a fake face.
Do not ignore the background entirely
If the room is distracting, move one or two things before filming. The app should help, not do all the work.
The best use case for this hack
This works especially well if you are:
- filming daily or several times a week
- shooting on an older iPhone or Android phone
- recording indoors at night or in mixed lighting
- making talking-head videos, tutorials, storytimes, or product clips
If you are already posting often, saving even 10 minutes per video adds up fast. More important, it keeps your workflow simple enough that you will actually stick with it.
A good rule of thumb
If someone notices your video looks clean, you succeeded. If someone notices you used a filter, you probably went too far.
That is the whole game. Short-form audiences forgive a lot, but they react badly to footage that looks accidental. Clean color, clear skin tones, and less visual clutter make your videos feel more trustworthy, even when the phone and the room were working against you.
At a Glance: Comparison
| Feature/Aspect | Details | Verdict |
|---|---|---|
| One-tap retouch | Applies face cleanup, exposure balancing, and light sharpening in seconds. | Best option for speed. Great for daily creators. |
| Manual pro editing | Full control over skin tones, color, masking, and background fixes, but takes much longer. | Better for polished campaigns, overkill for most Reels and TikToks. |
| Heavy beauty filters | Smooths aggressively and may reshape facial features or blur details too much. | Avoid for most creator content. Easy to spot and hurts credibility. |
Conclusion
You do not need pro software or a perfect filming setup to make your clips look better. A light, phone-only retouch pass can fix the exact things that make decent footage look cheaper than it is. And right now, when feeds are packed with fake-looking AI video, clean human-shot footage stands out more than ever. That is why this simple video editing retouch hack for reels and tiktok is worth adding to your routine. It makes your Shorts, Reels, and TikToks look brighter, sharper, and more professional without turning editing into another exhausting job. For small creators, especially those shooting on older phones or in bad lighting, it is one of the fastest ways to close the quality gap and keep posting without burning out.