The ‘Preset Timeline Sync’ Hack: Drop-In Edits That Auto-Fit Every Social Platform
If you make short videos every week, you probably know this pain a little too well. You finish one solid edit, then spend the next hour making it fit Reels, TikTok, Shorts and Stories. Then the caption gets cut off. Your logo slides too close to the edge. A hook that looked perfect in one version suddenly sits behind platform buttons in another. Before long, you have four duplicate timelines, three export folders, and no clue which version is the “final” final. The fix is not another magic button. It is a preset timeline sync setup. Think of it as building one clean master edit, then dropping that edit into platform-ready timelines that already know where text, logos and framing should sit. Once you set those rules once, your future edits stop feeling like resizing punishment and start feeling fast again.
⚡ In a Hurry? Key Takeaways
- Use one master edit plus platform-specific preset timelines instead of duplicating and rebuilding every sequence by hand.
- Create safe-zone guides, text positions, logo layers and export settings once for TikTok, Reels, Shorts and Stories, then reuse them for every project.
- This gives you more control than one-click repurposing tools, and it cuts down on cropped captions, missed branding and wasted re-exports.
What “Preset Timeline Sync” actually means
This sounds more technical than it is.
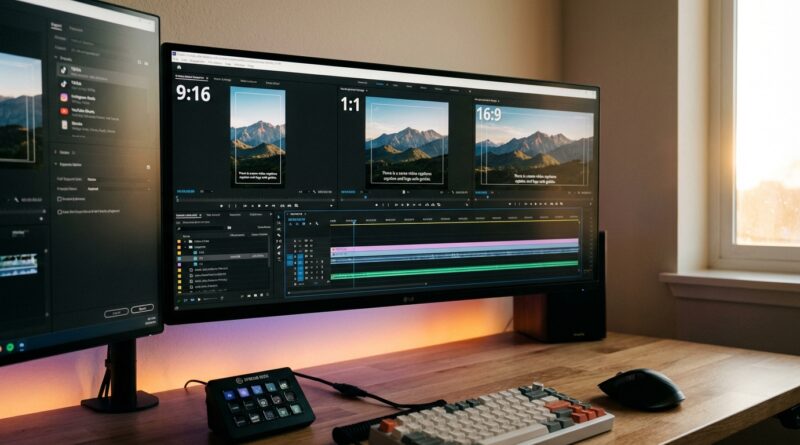
You create one main timeline where you do the real edit. Cuts, pacing, sound, color, hook, all of that lives there. Then you build a few empty “destination” timelines for each platform. Each one already has the right aspect ratio, safe-zone guides, brand layer, text style and export preset baked in.
So instead of starting from scratch every time, you drop your finished edit into those timelines and make only the small framing changes that matter for that platform.
That is the hack.
It is one of the most practical ways to build video editing presets for TikTok Reels and YouTube Shorts without trusting an app to guess what should stay on screen.
Why this works better than duplicate timelines
Most people do this the hard way. They finish a 16:9 edit, duplicate it, change it to 9:16, move text around, then do it again for another app. That works for a while. Then the project gets messy.
Small changes become a headache. Fix one subtitle in one sequence, now you need to remember to fix it in three others. Swap a logo, same problem. Change your lower-third style, now every old template is inconsistent.
A preset timeline workflow keeps the chaos contained. Your main edit stays clean. Your platform timelines act more like smart containers than full rebuilds.
The big win is consistency
Your intro can land in roughly the same visual area every time. Your captions stop drifting. Your logo stays visible. Your call to action does not sit under TikTok buttons or Instagram overlays.
That matters more than people think. A decent short that is framed well often beats a great short that looks cramped or sloppy.
How to build the setup once and keep using it
You do not need fancy software for the idea. Premiere Pro, Final Cut, DaVinci Resolve and even some mobile editors can do parts of it. The exact buttons will change, but the structure stays the same.
1. Make one clean master timeline
This is your source edit. Use the highest quality version here. Keep your main talking head or subject framed as well as possible. Avoid placing important text right near the edges if you know vertical versions are coming later.
If you want a stronger opening before you do the platform versions, this is a good point to look at The ‘Auto-Hook Timeline’ Hack: Use One AI Tool To Stress-Test 10 Intros Before You Edit A Single Reel. A better hook at the start saves time later because you are not polishing four versions of a weak intro.
2. Create platform timelines as templates
Build separate timelines for:
TikTok 9:16
Instagram Reels 9:16
YouTube Shorts 9:16
Stories 9:16
Yes, some of these share the same shape. But the screen furniture is different. Buttons, captions, profile areas and safe viewing space vary just enough to matter.
3. Add your safe-zone guides
This is the part most creators skip, then regret.
Add guides or overlay graphics showing “do not place text here” zones. Keep your headline, lower captions and logo inside the safe zone, not just inside the frame.
If your editor supports guide layers, use them. If not, make a transparent PNG overlay and lock it on a top track.
4. Save your text and logo positions
Create your standard top hook text, subtitle box, name tag and logo placement. Save them as presets, titles, compound clips or reusable graphics, depending on your editor.
Now every new edit starts with the same rules. That keeps your brand looking like a brand, not like a random collection of experiments.
5. Nest or drop in the master edit
Once your source edit is done, place it into each platform timeline. Then adjust scale and position for that platform only.
This is where the time savings show up.
You are not rebuilding the edit. You are just framing it properly inside a prepared layout.
What to adjust for each platform
Even with matching vertical formats, you should still check a few things manually.
Headroom and face position
If the speaker’s eyes are too high or too low, the clip feels off fast. A tiny scale or position tweak often fixes it.
On-screen text
Your opening hook should stay clear of app interface clutter. If a platform tends to place controls on the right or bottom, give your text more room.
Captions
Captions are often the first thing to get cropped. Keep them slightly above the bottom edge, even if it looks too high in the editor preview. On the actual app screen, it usually looks right.
Brand marks
That little logo in the corner should not fight with platform icons. If it does, move it. Branding only works if people can actually see it.
A simple workflow that saves real hours
Here is a practical version you can copy:
Step 1. Edit your main video once.
Step 2. Finish sound, color and cuts there.
Step 3. Drop that finished sequence into your TikTok preset timeline.
Step 4. Adjust framing, check text, export.
Step 5. Repeat in your Reels preset timeline.
Step 6. Repeat in your Shorts preset timeline.
Step 7. Export using saved platform presets.
That turns four messy rebuilds into one edit plus three quick checks.
Common mistakes that ruin the system
A preset timeline setup is simple, but a few habits can break it.
Making the master timeline too platform-specific
If you cram all your text and branding into the source timeline itself, you lose flexibility. Keep the core edit clean. Put platform-sensitive layers in the platform timelines.
Ignoring safe zones
Just because text is visible in your editor does not mean it will be visible in the app. Always check for overlays, buttons and caption bars.
Changing text styles every week
If every project gets a new font, new color and new placement, presets stop being useful. Pick a system and stick with it.
Exporting without previewing on a phone
Desktop preview lies sometimes. Send yourself a test export and watch it on an actual phone before batch-exporting ten clips.
Who gets the most value from this
This workflow is best for people posting often.
Daily Shorts creators. Solo business owners. Agencies handling client reels. Podcasters cutting clips from long interviews. Anyone making repeatable short-form content will feel the difference quickly.
If you only post once a month, this may feel like extra setup. If you post three to seven times a week, it is a lifesaver.
Why this beats the “one click” promise
Auto-reframing tools are getting better. Some are genuinely useful. But they still guess. They do not know your preferred headroom. They do not know where your logo should sit. They do not know which sentence in your opening deserves the biggest text treatment.
A preset timeline workflow gives you control without forcing you to repeat boring work.
That is the sweet spot.
You are not doing everything manually. You are only making the decisions that actually need a human eye.
At a Glance: Comparison
| Feature/Aspect | Details | Verdict |
|---|---|---|
| Master edit plus preset timelines | One clean source sequence feeds platform-ready timelines with saved safe zones, text styles and export settings. | Best mix of speed and control. |
| Duplicated sequences for every platform | Easy to start, but quickly becomes messy when you need to update captions, branding or framing across versions. | Fine for one-offs, bad for regular posting. |
| One-click auto repurposing tools | Fast for rough drafts, but framing, text placement and brand consistency often need manual fixes anyway. | Useful helper, not a full replacement. |
Conclusion
If your week keeps disappearing into resizing clips, this is one of those boring fixes that actually changes your output. Platform-specific edits are exploding right now thanks to new tools that promise one-click repurposing, but most creators are still manually pushing keyframes and text boxes around for every version. A focused preset-timeline workflow gives you something those tools often do not. Real control. You lock in your framing rules, safe zones and brand layers once, then reuse them forever. That means your hooks stay in frame, your captions stop getting chopped, and your exports stop multiplying for no reason. More important, you get your time back. In a week where every editing app is shouting about AI, this kind of simple, battle-tested structure can quietly double output for anyone grinding out daily short-form content.