The ‘Template Stack’ Hack: Build a 5‑Scene Preset So Every Reel Edits Itself
Opening a blank timeline is one of those tiny creator chores that somehow eats your whole afternoon. You know the drill. Drop in the hook. Trim the pauses. Add captions. Find the zoom point. Rebuild the same five beats you used yesterday, and the day before that. The tools look fast, but the process still feels messy. That is the part that wears people out.
The fix is not another shiny app. It is a repeatable video editing template workflow for reels and tiktok. Full-time editors have been saying the same thing all over creator forums this week. Standardize the bones of the edit first. Then fill in the content. If most of your short videos follow a familiar rhythm, you can build one 5-scene preset, save it in your editor, and stop making the same decisions over and over. The result is less guesswork, faster publishing, and a cleaner look across every Reel, Short, and TikTok you post.
⚡ In a Hurry? Key Takeaways
- Build one 5-scene short-form edit structure, save it as a template, and reuse it for every Reel or TikTok.
- Preset your captions, intro timing, cut style, text placement, and ending CTA so each new video starts half-finished.
- Templates save time, but keep room for small tweaks so your videos do not start feeling robotic.
Why this hack works so well
Most short-form videos are not as unique as they feel when you are editing them.
That is not an insult. It is good news.
If your content usually includes a hook, a setup, the main tip, some supporting visuals, and a call to action, then you already have a structure. You just have not turned it into a saved system yet.
That is what a template stack is. Not one effect. Not one caption style. A stack of repeatable choices that come preloaded before you even drag in new footage.
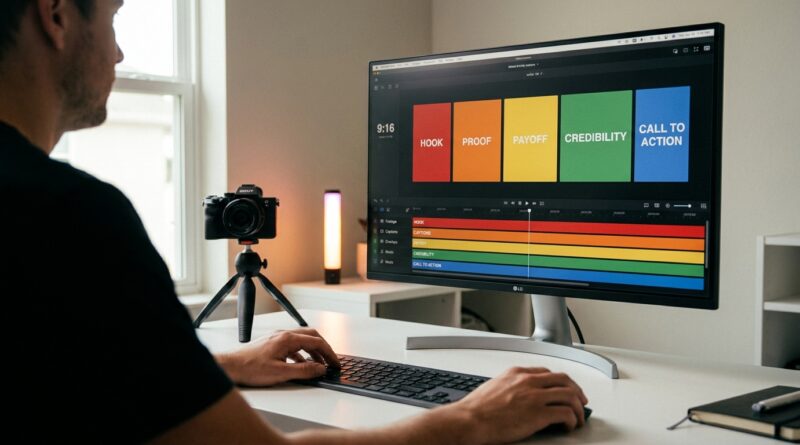
The 5-scene preset that makes editing easier
Think of your Reel or TikTok as five small blocks. You are not locking yourself into one boring style. You are creating a default path so you stop staring at the screen wondering what comes next.
Scene 1: The hook
This is the first one to three seconds. It should answer one question fast. Why should anyone keep watching?
Your template for this section might include:
- A big caption style for the opening line
- A slight zoom-in or punch cut
- A branded text position that stays clear of app buttons
- A quick sound effect or whoosh, if that fits your style
Save the timing. Save the text style. Save the placement.
Scene 2: The setup
This is where you explain the problem, promise the payoff, or give context. It is usually three to seven seconds.
Your saved setup scene can include:
- Smaller captions than the hook
- A standard lower-third title
- A simple jump-cut rhythm
This is also where many creators waste time rewriting on-screen text styles from scratch. Do not. Pick one readable look and keep it.
Scene 3: The main value
This is the meat of the video. The tip. The demo. The explanation.
Here, your preset should focus less on decoration and more on clarity:
- Default caption formatting
- Consistent cut spacing
- Placeholder spots for screen recordings, product close-ups, or B-roll
If your videos often need visual support, this is a great point to pair your workflow with The ‘Instant B‑Roll Brain’ Hack: Let AI Fill Your Cuts So Your Reels Never Look Cheap Again. A good template handles structure. B-roll helps it feel finished.
Scene 4: The proof or payoff
Show the result. Before and after. A screenshot. A reaction. A fast recap.
This section often gets skipped, which is a mistake. Viewers trust what they can see.
Your template here might use:
- A split-screen layout
- A quick highlighted caption like “Here’s the result”
- A subtle pause in the music or cuts so the point lands
Scene 5: The CTA
Do not reinvent your ending every time.
Your last scene can be two seconds long and still do its job. Ask for a follow. Point to the caption. Invite a comment. Tease part two.
Create one reusable CTA card with your usual wording and brand look. Then swap the line if needed.
What to save inside the template stack
This is where people get real time back.
Do not just save an empty sequence and call it done. Save the choices that usually slow you down.
Save these as presets if your editor allows it
- Project size set to 9:16 vertical
- Safe text placement away from app interface buttons
- Caption font, size, color, and highlight style
- Intro and outro text boxes
- Default music track or audio bed at low volume
- Zoom effect or punch-in style
- Color correction or filter, if you use one consistently
- Lower-thirds, title cards, and CTA cards
- Bins or folders for footage, voiceover, music, and exports
How to build it in the apps you likely already use
You do not need to switch software for this. The idea works in almost any editor.
Instagram Edits
If you edit inside Meta’s own ecosystem, create a reusable project with your basic timing, text placement, and saved visual style. Duplicate it each time instead of starting from scratch.
VN
VN is great for creators who want timeline control without desktop-level complexity. Build one master project with five labeled sections, text styles, and placeholders. Then duplicate the project for every new video.
Descript
If your videos start from talking-head footage or voiceover, Descript can work well as a repeatable sequence tool. Save scene order, title cards, and caption settings. This is especially useful if you script often.
CapCut alternatives
Even if you are moving away from CapCut, the same logic applies. Use templates, duplicate sequences, save text styles, and standardize your pacing. The software matters less than the repeatable structure.
How long each scene should be
There is no perfect formula, but here is a simple starting point for a 20 to 35 second short:
- Hook: 1 to 3 seconds
- Setup: 3 to 6 seconds
- Main value: 8 to 15 seconds
- Proof/payoff: 3 to 6 seconds
- CTA: 2 to 4 seconds
If your content is faster, shrink it. If it is educational, give the main value scene more room. The point is not strict timing. The point is a repeatable map.
Common mistakes when making a reel template
Making it too fancy
If your preset has six animations, three sound effects, and a dozen moving text layers, you built a burden, not a shortcut.
Locking every video into the same personality
Consistency is good. Sameness is not. Keep the structure fixed, but change your examples, visuals, pacing, and wording.
Ignoring mobile readability
Big problem. A beautiful desktop layout can become unreadable on a phone. Test your text size and placement on an actual device.
Forgetting export settings
Save your export defaults too. Resolution, frame rate, file naming, and destination folder all matter when you are trying to move quickly.
A simple setup you can make today
If you want the easiest possible starting version, do this:
- Create a new 9:16 project.
- Add five blank color cards or markers labeled Hook, Setup, Value, Proof, CTA.
- Add your default caption style.
- Add one opening text box and one ending CTA card.
- Add your usual music bed at low volume.
- Save the project as “Shorts Master Template.”
- Duplicate it every time you start a new video.
That alone can cut a surprising amount of friction.
Who benefits most from this workflow
This works especially well if you are:
- A solo creator posting several times a week
- A coach, consultant, or educator making talking-head videos
- A product-based creator showing demos or tutorials
- A freelance editor handling repeat client formats
If every video you make is wildly cinematic and one-off, a rigid template may not help much. But for social content, repeatability is usually your friend.
At a Glance: Comparison
| Feature/Aspect | Details | Verdict |
|---|---|---|
| Speed | A saved 5-scene structure removes repeated setup work like captions, intro cards, timing, and CTA formatting. | Big time-saver for regular posting |
| Consistency | Keeps your Reels and TikToks visually similar without forcing identical content. | Excellent for brand recognition |
| Creative Flexibility | You can still swap footage, pacing, B-roll, and text. The template only handles the repeated framework. | Best when used as a guide, not a cage |
Conclusion
If your short-form editing process feels chaotic, that does not mean you need more software. It usually means you need fewer decisions. Across creator forums in the last 24 hours, the most shared advice from full-time editors is not “grab another AI tool” but “standardize your workflow.” Social-first editors like Instagram Edits, VN, Descript and CapCut alternatives are all pushing presets, sequences and layout templates because they quietly cut hours from each project while keeping quality consistent. Build your repeatable 5-scene structure once. Save it in the editor you already use. Then let every new Reel start with a strong backbone instead of a blank screen. You will publish faster, burn out less, and your baseline quality will rise without adding more chaos to your day.